Monday, February 21, 2011

Where's the beef, tacos

We don't do a lot of beef around here, so I thought I'd give one of my favorite ingredients some much overdue love.  Sticking with the theme from last night, these beef tacos have strong Mexican underpinnings and can pack a punch.  I would recommend using ground beef from your local farmer's market.  It's usually a good price, and has tons of flavor (it hasn't been sitting on a truck from Kansas for a week).  Here, the spices really bring out the best in the dish ... I frequently make slight alterations to this recipe, but the core is always the same.  Cumin and beef are *very* good friends.

Recipe:
1 lb. fresh ground beef
1 cup sweet corn kernels

1 cup black beans, rinsed
1/2 red bell pepper, diced
1 small jalapeño (optional), minced
1 small yellow onion, diced
2 cloves garlic, minced
1/2 cup cheddar cheese, grated1 tbsp olive oil
1 tbsp Worcestershire sauce (I prefer Lea & Perrins®)
1 tbsp cumin powder
2 tsp garlic salt
1 tsp black pepper
sea salt to taste
6 - 8 small tortillas

Here's the beef!
-> Add oil to pan and turn heat to medium.  While oil is heating, rinse beans if you haven't already done so.  Add corn, beans, and red bell pepper to a separate sauce pan.  Throw in half of your spices, and keep tasting it as it cooks to adjust as necessary.  Heat this mixture over medium heat for about 5 minutes (10 or more if you're using frozen veggies).  Add onion, garlic, and jalapeños to oil and let sizzle until onions are translucent, then add beef, remaining spices, and Worcestershire sauce.  Cook until beef is brown all the way through.  While beef is cooking, I like to heat up my tortillas.  This can either be done in a pan (I recommend adding a bit of olive oil) or in a toaster oven, wrapped in some foil.

Add the corn, bean and pepper mixture to tacos with beef, grated cheese, and any garnish you prefer (cilantro or hot sauce are my two choices).
Enjoy!

Sunday, February 20, 2011

Cheesy Chicken enCHiladas

Derek's Dad is well known for his post-Thanksgiving turkey leftovers enchiladas.  These have been a long time Ehrman favorite, and tonight we put a new spin on a classic treat.  The key here is cheese.  Lots of cheese.  We make a standard Béchamel sauce with cheese, onions and peppers mixed in (a Béchamel with cheese is also known as a Mornay sauce).  This is then combined with chicken chunks (we used the leftovers from a chicken cooked whole) and wrapped in tortillas and baked until golden brown.
Recipe:
- olive oil
- 1 medium onion, chopped
- 2 cloves garlic, minced
- 1/4 cup flour
- 1 1/2 cup milk
- 1 tbsp cumin powder
- 1 tsp chipotle pepper (or plain old pepper will do)
- 1 1/2 cup grated cheese of your choice
- salt to taste
- 1 cup pepper of your choice, diced (jalapeño, green chiles, bell, whatever you like)
- 3 bunches tatsoi (can also use spinach or any other greens that wilt nicely), chopped
- 1 to 1 1/2 cups chicken cooked, chopped or shredded
- 10 to 12 small corn tortillas (or 5-6 large)

-> Preheat oven to 375 degrees.  Heat liberal amount of olive oil (at least enough to cover the bottom of a 10" frying pan) over medium heat.  Add onions and garlic and sauté until translucent.  Gradually whisk flour into oil-onion mixture, making a rue.  Allow the rue to cook until a slightly nutty brown color, whisking constantly.  Whisk in milk and cook over very low heat until thick and bubbly.  Whisk in one cup of the cheese.  Add cumin, pepper, and season to taste with salt.  Mix in peppers, tatsoi, and chicken and heat until warmed through and greens have wilted.  Put aside about 1/2 cup of the mixture.  Fill tortillas with remaining mixture and place in large baking dish.  Pour the reserved 1/2 cup mixture on top of the tortillas, cover with 1/2 cup of cheese and bake until golden brown.
~*TIP - If you, like us, used the trimmings from a previously cooked chicken, be sure to put those bones to good use! Boil chicken leftovers (bones, skin, everything!) with your saved onion, garlic, and carrot peels (lots of other choices too!!) for approximately 1 hour for a rich and multi-functional chicken broth.*~

Feeds 3 - 4

Tuesday, February 15, 2011

Cold Frames 101

We are back in the garden now with a brief overview of cold frames and of my recent cold frame building experience (see photo below).  I was hoping to get this cold frame built last fall, but early Carolina cold spells stopped my fall season short.  So of course, the first sunny day of this February, I was out in the front yard digging.  One good day of digging and drilling will hopefully give me a big jump start on my spring (and later summer) gardens.  Can you tell I'm in a hurry to get started this season?  
What is a cold frame?  
A cold frame is basically a wooden box with some kind of clear glass or plastic on the top.  Some people even build them out of straw or hay bales rather than out of lumber.  

Why use a cold frame?  
Using a cold frame allows you to extend your gardening season in several ways.  In the fall, you can plant root vegetables and hardy greens for harvesting throughout winter, and in spring, you can harden off plants in it earlier than frosts would allow directly in the garden.  

How does it work? 
 The glass allows the sunlight and warmth to come in through the top.  That warmth and warmth from the ground is trapped in the frame enough to raise the temperature inside the frame, protecting plants from frost, even late into fall and winter and early in the spring.  

How did I build mine?
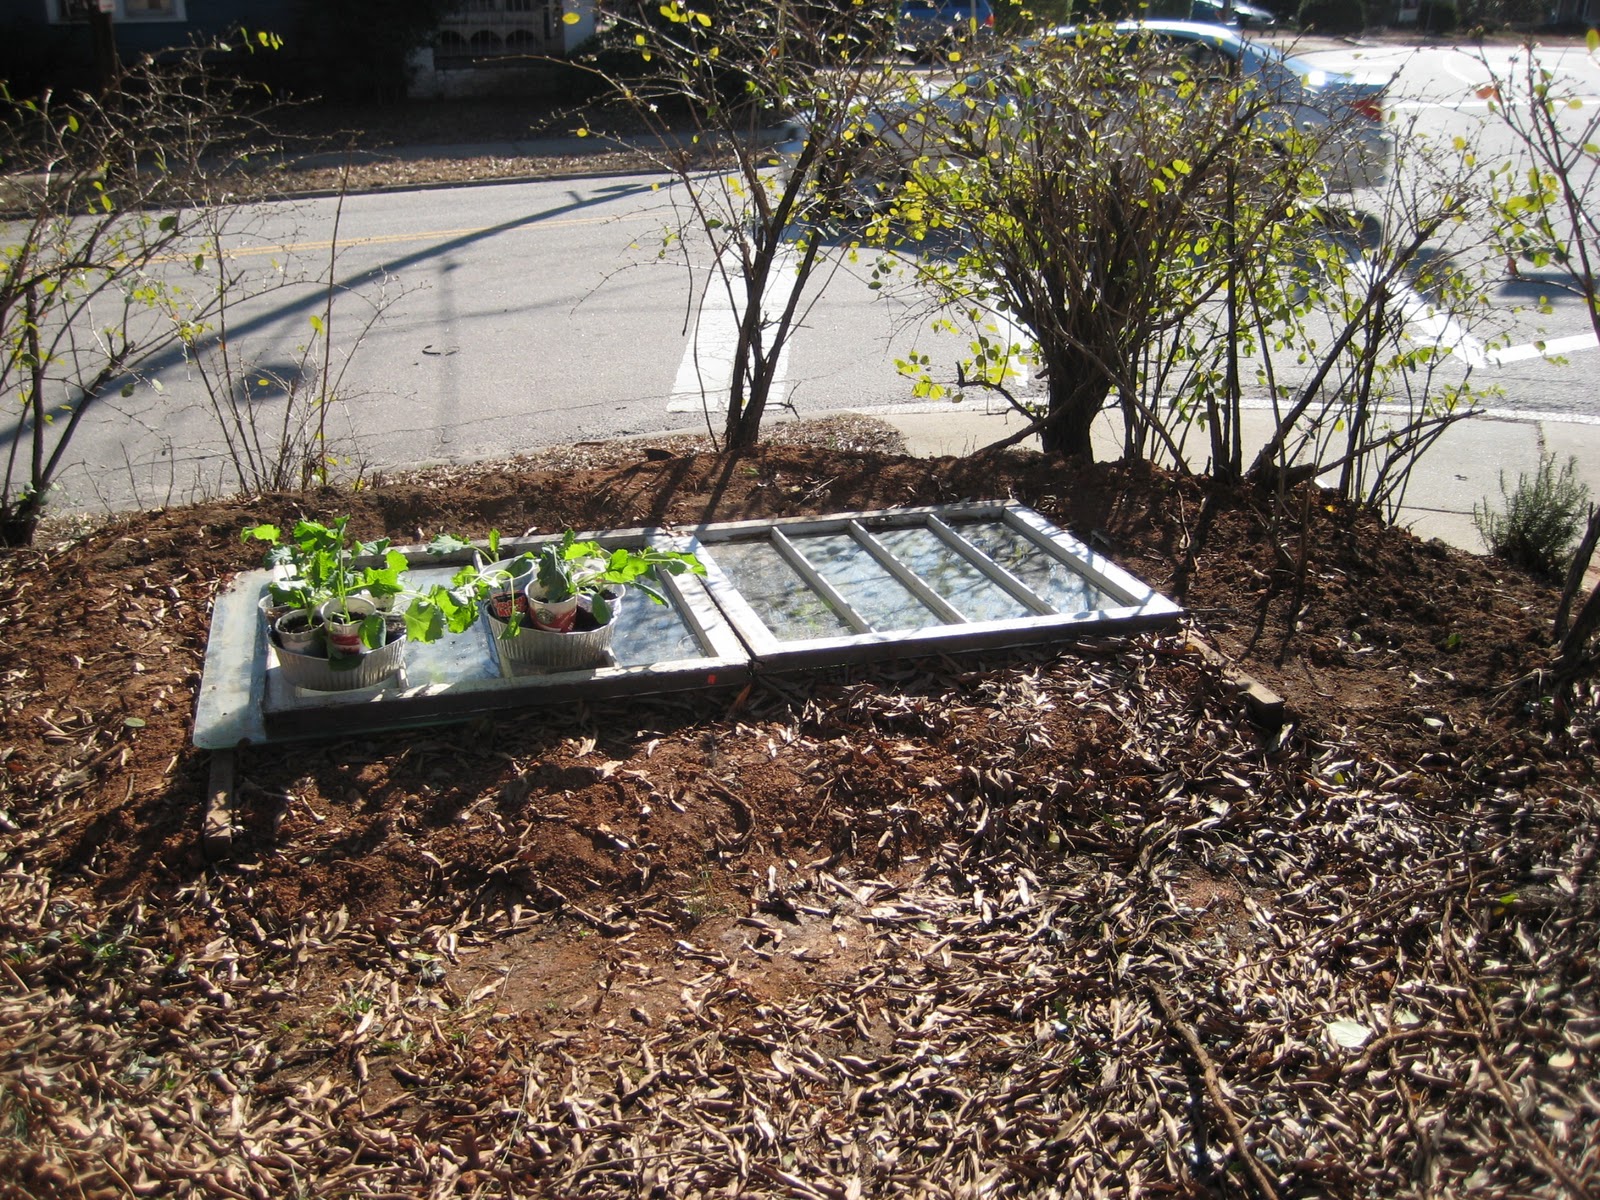
My cold frame is a fairly make-shift version with minimal investments in new supplies (big surprise), but I'm very pleased with the final result.  I'm not going to get very technical here with dimensions and technique because honestly, I didn't get that technical when building it.  
-Materials:  I had some scrap lumber discovered in the back yard, some wood screws bummed off of my constructionally-inclined roommate, and a couple of great old windows purchased at the Scrap Exchange, a reuse material store in Durham for those of you in the area.  
-Frame construction:  The wooden frame was just built by constructing my scrap wood into a rectangle and attaching the boards with the wood screws using a power drill.  
-Putting it all together:  From there, I used an edging shovel to outline the wooden rectangle in the yard where I wanted my frame, then dug out a rectangular hole in the ground about 10 inches deep.  The wooden frame was then placed on top of the newly dug whole, and the excess dirt built up around it to eliminate any gaps between frame and ground.  Finally, my windows are just laid on top of the frame for now.  I may add hinges later, but for now, this is working just fine.  

Important note:  Cold frames are often just laid on top of the ground at ground-level rather than dug into the ground.  Digging the frames into the ground to the depth of mine can risk flooding after big rains or melting snows, particularly if your frame is at a low point in the yard.  However, I chose to dig my frame into the ground to this depth to add the height needed to place larger seedlings in it without having to purchase extra wood to build my cold frame taller.  I don't foresee much of a flooding risk, as my frame is at a high point in the yard, and we don't get a lot of big melt outs here.  

Finished Product!
Below you can see the frame open with many early spring seedlings in there being hardened off before heading out to the garden.  By being out in the cooler temperatures of the cold frame between the warmth of the indoor grow lights and the chill of the open garden, they should be much more hardy and resistant to cold spells once out in the garden.  Before transitioning the seedlings from cold frame to the garden, I like to let them set out during the day for a couple days (as you can see in the first picture above).  

Also inside you can see that I have placed some old broken mirrors around them to reflect more sunlight onto the plants as well.  Finally, I encountered a few large tree roots in my digging, which, for now at least, are happily coexisting with my seedlings.  
Alternatives to cold frames?
If you want something more serious, a greenhouse is always an option.  But if you are looking for ways to get your plants out a little early with something simple and inexpensive/free, try just covering plants with makeshift cloches.  Instead of purchasing expensive (yet admittedly more attractive) glass cloches, try using clear plastic bottles with the bottom cut off to secure around your newly-planted tender seedlings while frost is still a risk.

Monday, February 14, 2011

Moroccan Autumn Tagine

This is another recipe adapted from one of my favorite seasonal cookbooks, Simply in Season.  Derek and I decided to add chicken since we had some on hand, but it would easily be just as good vegetarian as originally listed in the cookbook.  With sweet potatoes still in abundance here in North Carolina, we are always looking for new ways to use them.  Their sweetness combined with that of the peas is delicious, and the Moroccan spice combination is a welcome change from our usual repertoire.  
Recipe:
-2 chicken breasts, bone-in and skin on, cooked (see TIP below), boned and skinned, chopped
-liberal amount olive oil
-1 medium onion, chopped
-1 tsp ginger
-1 tsp cumin
-1 tsp paprika
-3 cloves garlic, minced
-2 c broth
-3 sweet potatoes, skinned and chopped
-2 c garbanzo beans, soaked, precooked, and drained
-2 c peas
-1 c couscous

->  Heat oil in a deep pot or dutch oven over medium heat.  Add onions and sauté until translucent.  Add spices and garlic and sauté a few minutes more.  Add liquid and then beans and potatoes.  Bring to a boil, reduce heat and simmer until potatoes are fork-tender.  Add peas and chicken and heat through. 
Meanwhile, prepare couscous as you would rice, with two-times as much liquid as couscous.  Here, we used the extra broth in which the chicken was cooked (see TIP below), making extra-flavorful couscous.
Serve chicken and vegetable mixture over couscous and enjoy.

~*TIP:  To infuse your chicken with a ton of tasty flavor, cook it in broth, and/or feel free to add any saved-up vegetable peels (see TIP from previous post here) to the cooking liquid.  Season with an assortment of whatever spices you think will complement the dish, such as salt, black pepper, a teensy bit of chili powder, garlic salt, and a little bit of chipotle black pepper (if you have it), used here.  *~

Saturday, February 12, 2011

Sausage Pilaf and Roasted Root

This meal just evolved out of combining whatever was on hand...  but it turned out to be a super-tasty way to use some seasonal veggies from my Papa Spuds (see TIP below) box this week!  My roommate came back from his Grandma's house this Christmas with enough pork products from her farm to fill our freezer.  This week, he had thawed out a package of seasoned pork sausage, and I made use of it in the dish below.  Not to mention the Matson maple syrup mmmm....
Recipe:
-5 c chopped winter root vegetables (sweet potatoes, turnips, rutabegas, carrots, etc.)
-1 large onion, chopped
-1-inch piece ginger, minced
-1/4 c (Matson) maple syrup
-olive oil
-1/4 lb seasoned sausage
-2-3 cups of cooked mixed whole grains (like the mix below, whole wheat berries, barley, steel-cut oats, brown rice, millet or whatever you have on hand)
-1 large bunch kale, rinsed and chopped

->Preheat oven to 425 degrees F.  Mix chopped veggies and onions with ginger, syrup, oil, and ginger and season with salt and pepper.  Spread in a single layer on a roasting pan.  Roast for about 20-30 minutes until fork tender and golden brown, stirring occasionally.  
Meanwhile, brown the sausage in a pan over medium heat.  
Saute the mixed whole grains.  Add chopped kale turn off heat, cover and set aside to let wilt.  Stir before serving.  
 
~*TIP:  If getting to the farmer's market doesn't always fit into your schedule each week or if you just don't have one close by, consider signing up for Community Supported Agriculture (CSA).  It's like the vegetable version of Christmas each week.  You can find more information and a great nation-wide map of markets and CSAs here.  Or, in the triangle area, another option, especially if you're just getting started with trying to purchase locally, is Papa Spuds, which will deliver local and organic produce, dairy, meat, and other treats to your door.  The only drawback is there's also a lot of non-local products on there (sometimes even when they're in season here), so shop carefully.*~

Friday, February 11, 2011

Whole Grain Yogurt

Time to make a brief foray into recipes again for the moment...  We'll get back to seedlings soon enough.  My roommate introduced me to the idea of whole grain yogurt.  Apparently it was a favorite of hers when she lived in London, where you could get it at the supermarket.  I decided to try to make my own the other day, and I think it will become a staple in my diet from now on!  The nutty, chewy grains are a welcome new twist on the idea granola.  Try it out with whatever whole grains you have on hand.  
Recipe
-Whole grains (mix and match; I used whole wheat berries, barley, steel-cut oats, brown rice, and millet)
-Honey
-Spices (such as nutmeg, cinnamon, and ginger)
-Fresh fruit (this varies seasonally, but I love it with apples right now)

->  Combine equal amounts of all whole grains in a large sauce pot.  Add twice as much water as you have grains (like you would cook rice).  Add honey and spices to taste.  Bring to a boil.  Cover, reduce heat, and cook approximately 30 minutes or until all water is absorbed *trying not to peek*!  Remove from heat and allow to set about 5 minutes.  Fluff with a fork.  
Add warm grains to fresh yogurt.  Add fresh fruit as desired.  Enjoy!

~*TIP:  If you want to try to make your own yogurt, follow these simple instructions:  Scald a half-gallon of milk (at least 2% milk fat) mixed with about 1/4 cup dry milk powder on stove to about 180 degrees F.  Pour into a ceramic container (an unplugged crock pot will work) and let cool covered until temperature falls to 110-115 degrees F.  Stir some of the warm milk into about 1/2 cup of yogurt.  Pour yogurt-milk mix back into the rest of the milk.  Cover and then wrap in a blanket.  Let sit about 8 hours.  When you unwrap it, you'll have yogurt!*~

Thursday, February 10, 2011

The seedling factory...

I think I have been more systematic about my seed starting this spring than ever before, and so far, it's paying off.  Using lessons learned from many past failed attempts and new tips and ideas from my winter reading, I've set up a pretty serious seed-starting operation.  Not to mention, due to an absent roommate, we have an extra room this spring with an ideal south-facing window that I've taken the liberty of transforming into my own quasi-greenhouse.

Here's an overview of the steps I've taken (as mentioned in the previous post, with every step for every variety documented in the gardening journal).
  • Presprouting:  Presprouting your seeds before planting them has a few advantages over just planting directly in the soil.  (1) You can quickly see which seeds are viable, and avoid the effort and space involved with planting any seeds that will not sprout.  (2) Presprouting moves the germination forward a few days faster, with seeds generally germinating within a couple of days of planting after presprouting.  So, how to?  This year, I've been trying a new method.  As pictured to the right, for this method you want to wet a paper napkin (about as wet as a damp sponge), put it on the bottom of a clear plastic container, sprinkle your seeds on it, and then seal.  When you see your seeds sprouting, it's time to plant!  Very convenient and a great way to reuse those pesky plastic containers before recycling them.*  
*With most bigger seeds, presprouting is a great option, but very small seeds (like thyme, for example) are much too delicate to presprout and get into the soil without damaging them.  
  •  The Germinator:  This is both the name of the organic seedstarting soil I've used this year as well as what I like to call the domed structure to the right.  It's important to use sterile soil, so either buy special seedstarting mix or make your own, just be sure to sterilize it in the microwave or oven.  Plant your sprouted seeds in the seedstarting mix and cover with about as much soil as the diameter of your seed. Keep your soil very moist until the seedling emerges.  I like to use the plastic dome method to the right for this part, but as soon as the seedlings are up (as pictured below), I take them out of this environment which is much too damp and lacking in air circulation to keep seedlings healthy.  
    • Under the Lights:  Once seedlings are up, I move them under the lights (pictured to the right)...  My low-cost and low-consumption alternative to purchasing new grow lights is to purchase a few used desk lamps at local thrift stores and outfit them with CFL light bulbs.  These lamps, surrounded with mirrors and aluminum pans to reflect the light and in front of a bright, south-facing window, provide enough light to keep my seedlings from getting spindly.  I also keep a fan blowing low on them from a couple of feet away in order to increase air circulation (decreasing risk of disease and dampening off), to strengthen stems, and to get them more hardy and ready for the chilly early spring outdoors.  I keep lights just a couple of inches above the seedlings, readjusting as they grow, and rotate seedlings regularly to keep them from leaning too far in one direction toward the light.  The seedlings are watered daily, keeping them as moist as a wrung-out sponge, with just water, as fertilizer might "burn" them at this early stage of life.  You can see a sampling of what's growing so far below.  
    • Indoor Transplanting:  Between when the seedlings have produced their first true leaves (beyond the cotyledons they produce when they first emerge) and their second set of true leaves, it's time to transplant them to a bigger container with more fertile soil (see to the right).  For this purpose, I like to reuse disposable cups, collecting them from friends that may have forgotten their travel mug for their morning java.  ;)  I punch a few holes in the bottom, and fill with a mix of worm compost and potting soil (about 1/3 worm compost).  Then, gently untangle seedlings, putting each in its own new, upsized home.  From there, I start fertilizing every other watering with diluted worm tea (about 1/4 cup to 5 gallons water).  They stay under the lights for a while yet before heading outside, but the youngest seedlings get to hog most of the light.  
    Next up: Making our way outdoors...  to the cold frame!

    Wednesday, February 9, 2011

    Seeds! Where to start?

    Just a quick note on where to get seeds before we jump into my efforts at seed starting.  With the many stores, websites, and seed catalogs out there, it's easy to get overwhelmed with where to go for your seeds and what varieties to choose.  Below are a few key things to consider when purchasing seeds as well as a few of my favorite places to get them...
    1. Plant for Flavor and Beauty.  Plant things you will actually eat.  It's also a bonus if they'll add some nice color or texture to your beds (especially if your garden is on the curb, like mine).  But don't let this stop you from experimenting with things you've never tried before.  
    2. Plant Heirloom.  Try heirloom varieties!  This helps to maintain biodiversity by keeping many forgotten strains of fruits and vegetables growing in our gardens, avoiding the dangers of monocropping.  It's also really fun!  Experimenting with the many beautiful and sometimes strange varieties out there definitely beats the usual same-old, same-old at the supermarket. I love Seed Savers.  Getting their catalog (see pic to the right) each spring is like getting the toy catalog before Christmas when I was little.  
    3. Plant Regional.  Consider planting varieties that are known to do well in your region.  See previous post on books that will help with this.  If I hadn't done this, this Ohio girl may never have discovered okra...  so sad!
    4. Plant local.  Bypass the big box stores for a local garden center.  This will not only better support your local economy, but also, they will be able to provide a lot more advice and assistance on what to plant in your area and when to do it.  My favorite in this area for all of you in the triangle is Logan's Trading Co.  

    Tuesday, February 8, 2011

    Planning and Journaling

    Every gardening book I've read has recommended starting a gardening journal.  I finally did this past year, and I think it makes a big difference in my approach to the garden.  I have a place to compile all of that valuable information I read in gardening books and magazines.  I am much more conscious of my planning efforts. When things go poorly, I have peace of mind in knowing that I'll write down what not to do for next year to avoid making the same mistake twice.  That's not to say I am always the best at keeping up on my notes throughout the year, but I'm definitely improving.

    Here's an overview of what I keep in my notebook:
    • Notes:  These include notes on what I am doing and what I plan to do.  Don't pay attention to my impeccable handwriting here...  I try to keep my bright ideas all in one place...  as well as any notes on what/when I plant, harvest, diseases or pests that arrive, etc.  I also am sure to make very clear notes to myself for next year about what I should do differently.  In the back half of the journal, I keep more general notes from books and magazines about what I should be doing.  
      •  Garden Diagrams:  I drew this incredibly spatially accurate map (right...) of my garden and yard in the front.  I retrace it to make maps of water flows, where and when the sun shines, and (most importantly) what I plant where each season.  This helps me to avoid planting the same family of crops in the same place year after year...  and it helps me plan where things will go.  
        •  Planting Schedules:  These look a little different each season.  Sometimes they are organized enough to take the form of a spreadsheet, but other times they barely get scribbled in a margin somewhere.  My most recent spring planting spreadsheet has the name of the seed variety, the brand, when I bought it, when I presprouted it, when it germinated, when it was transplanted, and notes on what should/shouldn't be done again next year.  


          That's about it!  I keep a combination of electronic and written formats, but often print off the electronic and staple them into my journal.  Any format works.  The most important thing is finding a method that makes it easy for you to keep up with it.

          My favorite part of keeping the journal is that I can start "gardening" long before I can get outside to plant a thing!

          Now that all my plans are made, I can begin seed starting...  my favorite part of the year.

          Monday, February 7, 2011

          Winter Reading

          Once the garden gets going in the spring and summer, it's hard to find time to read about gardening...  but when the winter cold has you trapped inside with no green in sight, that's when I find myself pouring over the gardening books dreaming of spring.  

          So what have I been reading this winter to prepare for the spring?  Check out a couple of old standbys below and one new fun addition:  
          Old Standbys:  *
          • Month-by-Month Gardening in the Carolinas:  This reference has been very helpful to me as an Ohio native attempting to learn when to do what in my exploits as a now southern gardener.  It offers overviews of what you should be doing each month, dividing it between all types of gardening (i.e. vegetables, annuals, bulbs, lawn, shrubs, etc), but I pretty much only use the section on vegetables.  I like to keep a sticky note in the month I'm in at all times for a quick reference...  it helps me not to get ahead of myself or fall behind, my two biggest gardening struggles.  
          • Guide to North Carolina Vegetable Gardening:  This reference gives a general overview of most common vegetables to grow in NC, with recommendations for varieties that do well in my area as well as recommended planting times and common pests/diseases for this region.  I like to cross-reference planting directions on seed packets with what it says here.  I think you can get this book and the one above for just about any state/region.  I got the Georgia versions of both as a gift for my brother in Atlanta.  
          *  One drawback on both of these is that they are written more from a conventional (rather than organic) gardening perspective.  I use them as a guide to the region, but forgo their advice when it comes to things like soil building, fertilizing and pest control.


          Favorite New Addition:
          • The Urban Homestead:  Derek got me this for Christmas, and I love it!  It goes way beyond just gardening, discussing everything from homemade cleaners to sourdough bread...  all geared toward making your lifestyle more self-sustainable and sustainable in general.  I love the parts on gardening and find it a refreshing innovative approach to a lot of common tasks.  
          So how dos we transition from all of this information gathering to action?  Next up are planning and journaling...