Thursday, April 21, 2011

Orange and Green Asparagus

There are those times when you pull random ingredients off the counter and out of the fridge around lunchtime to throw something together, and it turns out less than delicious, but then there are those days when whatever you have around seems to magically go together just right.  Enter, orange and green asparagus.  Asparagus with citrus and garlic is nothing new, but this take on a classic pairs the flavors of orange, green garlic and fresh chervil for something fresh and new.  This leads me to one of my favorite things about receiving a box of seasonal produce each week...  It spurs me to try out new ingredients in new combinations, yet each dish is still reminiscent of classic flavor combinations.  Why are these flavor pairing so familiar, and why do they seem to go together so naturally?  Perhaps because they harken back to dishes that emerged from generations of people cooking with whatever was in season, adapting their recipes and their palate to whatever was on hand.  
Recipe:
-Olive oil
-about 4 inches of green garlic, minced
-1 tsp orange zest
-juice of 2 oranges (or about 3/4 c)
-salt and pepper
-one large bunch of chervil, chopped
-1 bunch of asparagus, rinsed and woody stem removed 

->  Heat oil over medium heat in a medium pan.  Add green garlic and saute until translucent.  Add orange zest and mix.  Add orange juice and season with salt and pepper.  Simmer until reduced by about half.  Add chervil.  
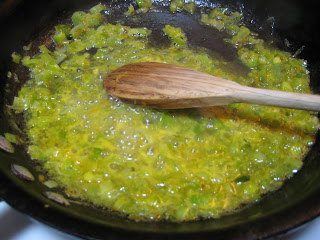
 
 Lay asparagus over sauce and stir to combine.  Allow to steam in the orange and green sauce until fork tender.  Toss and serve.
~*TIP(s): Chervil is similar in flavor to parsley, but with a slight anise flavor.  If you do not have access to chervil, you can substitute parsley for a less-anise flavor or tarragon for a more-anise flavor.  Green garlic can have a short window of availability, as it is the immature stalk of the garlic plant before it forms a bulb.  Mature garlic could be substituted in lesser amounts for the green garlic in this recipe, but it would still result in a much more pungent, less fresh flavor.  A better substitute if green garlic is not available might be leeks or even green onions.*~  

Wednesday, April 20, 2011

Matrimonial Strawberry Goat Cheese Pie

I made this pie for my roommate's wedding this past weekend.  Although others said it was *surprisingly* delicious, I'll never know, as it was gone by the time I made it to the front of the pie line...  So sad.  I guess I will just need to make another!  Strawberries and goat cheese is one of my favorite combinations, so why not have them in pie form?  Try it out.  I know I will again.  
*
Recipe:
-1 pie shell, baked and cooled
-1/2 c orange juice
-3/4 c sugar
-1 c strawberry jam (I used my mom's jam, but you could also use mashed fresh strawberries)
-3 Tbsp corn starch
-6 oz goat cheese
-1/4 c whipping cream
-1 quart strawberries, halved

->For glaze, combine juice, sugar, jam, and corn starch in a medium saucepan over medium heat.  Cook until thickened and bubbly.  Allow to cool to room temperature.

Meanwhile, whip goat cheese and cream together with whisk or hand mixer until light and creamy.  Fill chilled pie shell with goat cheese mixture, spreading evenly.

Top with halved strawberries in concentric circles, pointy end up.  Coat with cooled glaze mixture until just covered (you may have extra).  Chill for about 4 hours, and then serve!

~*TIP:  As recommended by the bride, this pie is sitting on a do-it-yourself pie stand.  A quick trip to goodwill resulted in several combinations of eclectic plates, vases, and candy dishes.  I glued each plate to the top of an upside down vase or dish for a great pie stand.  I was in a hurry, so I just used hot glue, which will work temporarily, but if you want a more permanent piece, use epoxy.  *~

*Thanks to Eric George for getting the above picture of my pie, as I did not think to get a shot of it during all the rush!

Monday, April 18, 2011

Sauted Spring Greens

Those spring greens in my first spring salad are just as beautiful and tasty cooked up as they are cold.  The mix is changed up slightly for the sauted greens below, and it's a chance to use some of the older, more sturdy greens.  No recipe really needed for this one.  Just a few easy steps.  
->  Heat olive oil in a medium pan over medium heat.  Add a big pile of rinsed greens, still slightly wet.  Add fresh garlic or even garlic powder, as well as salt, pepper, red pepper, and a bit of nutmeg.  As noted earlier, nutmeg is my secret weapon against the bitter taste that makes many people think they don't like greens.  Be wary of over-seasoning, as that big pile of greens will quickly shrink, concentrating the flavor.  Also be wary of over-cooking.  Remove greens from heat when all are evenly wilted and stems are fork-tender.  Enjoy!  

For the greens pictured above, I have included red winter kale, broccoli raab rapini, lacinato kale, ruby chard, and ruby streaks mustard, all from the spring garden!  

*~TIP:  My favorite way to finish cooked greens is to spritz them with some Bragg's Liquid Amino Acids, similar to soy sauce but a low-sodium alternative, full of amino acids.  *~

Saturday, April 9, 2011

First Spring Salad

As soon as I have enough leaves on my lettuce that they will survive even if I pick a few, I can't resist making a delicious spring salad.  Each of the greens used here (see below) were started from seed during those long winter months, and now they are fresh and beautiful in my salad bowl!  See my post from last year for a break down of my favorite dressings, toppings, and greens.  I just had to share how beautiful these are and how excited I am for it to be this time of year again.  
This salad has a mix of young oak leaf lettuce, forellenschluss lettuce, australian yellow lettuceruby streaks mustard, bordeaux spinach, very small young lacinato (or dinosaur) kale, and very young ruby chard.  These are all dressed with a simple olive oil, apple cider vinegar, dijon mustard, salt and pepper dressing, and a smear of local goat cheese thrown in the middle.  Simple.  Fresh. Beautiful.  And tasty!  

Wednesday, April 6, 2011

Greens, greens, nothing but greens! OK, and tomatoes...

This is my first recipe of the new year that features produce from my spring garden. I came in one night with a beautiful bouquet of Greens, greens, nothing but greens from the garden!  I then added a few local spring onions and greenhouse tomatoes from my veggie box this week to make a pie full of spring.  See below for a quick and flavorful quiche filled to the brim with all kinds of greens.  
Recipe:  
-1 pie shell, uncooked
-olive oil
-1/2 large onion, chopped
-2 cloves garlic, minced
-1 large bunch of greens, chopped (I used probably about 6 cups of chopped greens - kales, mustards, and spinach)
-salt and pepper
-thyme
-nutmeg
-1 bunch spring onions, chopped (about 6 onions)
-6-8 eggs, beaten
-1/2 c yogurt
-1 large tomato, sliced
-1/4-1/2 c cheese (I used cheddar here)

->  Preheat oven to 425 degrees.  

Saute onions over medium heat in oil until translucent, adding garlic toward the end.  Then add greens. If they don't all fit at once, add the thicker ones first and let them cook down, and then add some of the more delicate greens (such as spinach) later in the cooking process.  Season well with thyme, salt and pepper, and a pinch of nutmeg.  I find the nutmeg takes some of the bitter taste out of the greens.  Add green onions.  Cook and mix until all greens have wilted.  

Meanwhile, add yogurt to beaten eggs and mix well.  Season well with salt and pepper.  
Pour greens mixture into pie shell.  Next, pour egg mixture over top, and give it a jiggle so that the eggs all settle into the spaces between the greens.  Finally, top with tomato slices and then cheese.  Bake until golden brown on top and eggs are set, about 30 minutes.  

~*TIP:  I make my Grandma's pie crust recipe that yields 5 single crusts.  I use whatever I need that day, and then form the rest into dough balls, wrap them in plastic, and put them in the freezer to pull out later whenever I need them.  Just pull one out a few hours before you need to use it.  Roll it out when thawed, but still chilled so that it holds together well.  I learned this trick for a pie sale fundraiser where I had to make enough crust for 50 pies ahead of time!  *~

Sunday, April 3, 2011

Take a walk through the spring garden so far...

The spring garden is still young, but filled with an exciting array of crops already! Check out the beautiful reds, purples, yellows, and greens in the pictures below.