Showing posts with label Canning & Preserves. Show all posts

Saturday, August 25, 2012

Stone Fruit Can Jam!

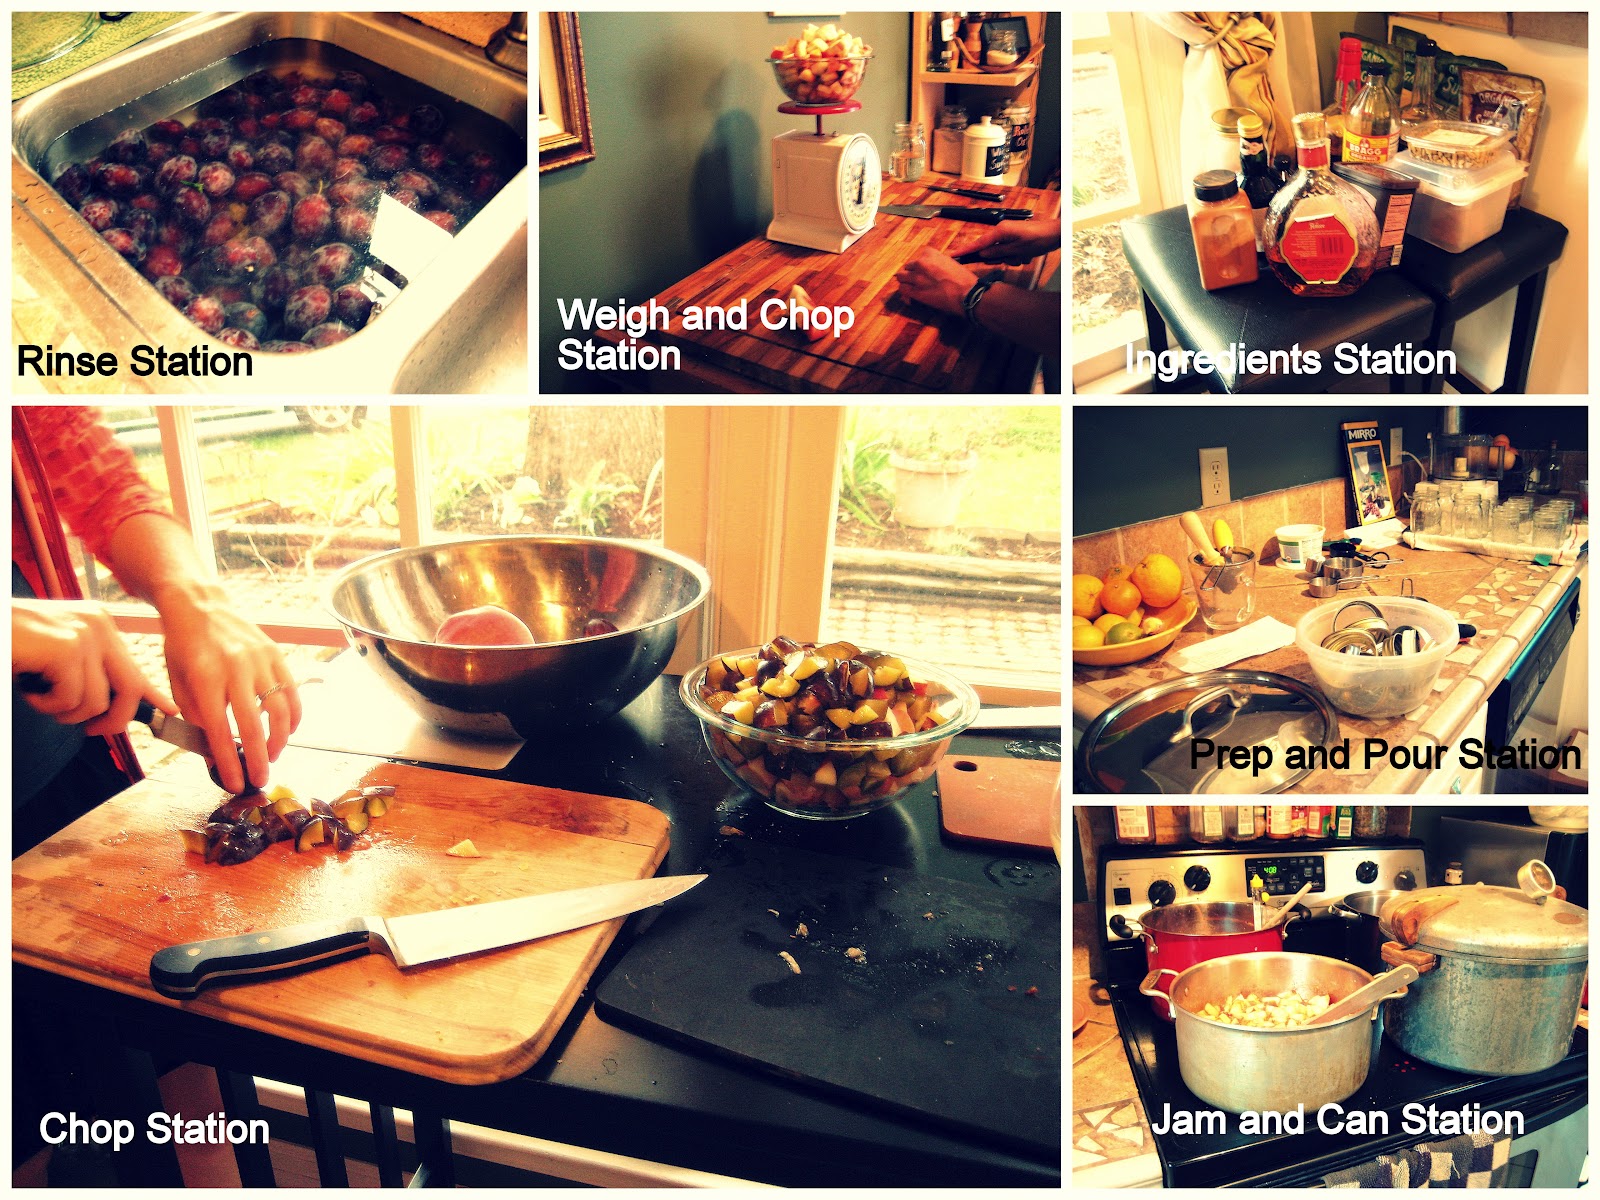
This past week, I risked buying 50 pounds of stone fruits before checking to see if there would be anyone to can it with me, but luckily, I found a few friends that were interested!  Four of us all chipped in to turn 25 pounds each of white peaches and damson plums into a delicious array of jams, butters, and syrups...  and then divvied up the bounty.  Below you can see our various stations - a good way to keep a kitchen from getting too crowded with several people all cooking multiple recipes at once!

Below I'll go through a few of our jam, butter, and syrup superstars from the day's efforts...  

JAMS and  BUTTERS:
Follow these instructions using any of the ingredient lists for the jams and butters below:

->  Bring all ingredients except vanilla and/or spirits (if used) to a boil in a heavy-bottomed pot over medium heat.


B:  If making a butter, cook fruit until just soft, and then process in batches in a food processor or blender until to the desired smoothness.  Return to pot.  

J:  If making jam, let simmer, stirring and mashing frequently with a potato masher.

Then continue to simmer either until mixture begins to thicken.


When you notice the mixture beginning to thicken, you can test if it has reached the jellying point in one of two ways:  (1) Use a candy thermometer to determine when the jam has reached 220 degrees F.  (2) Place a ceramic plate in the freezer until very cold.  Place a spoonful of jam on plate and return to freezer for about 30 seconds.  When removed from the freezer, if the jam wrinkles when you push it across the plate with your finger, it is ready.  If not, keep simmering!


Once jellying point is reached, remove any whole spices (if using), and add vanilla and/or spirits (if using).  Process in sterile jars.  You can use a pressure cooker for this (10 minutes at 5 lbs) or just a hot water bath (10 minutes at a rolling boil).  

RECIPES:  

Bourbon Peach (and Plum) Jams
Ingredients:
-4 lbs peaches (or mix of peaches and plums), rough-chopped
-4 c sugar
-1/4 c lemon juice
-1/4 c bourbon
-1 tsp vanilla
-pinch of salt
~*Note:  This recipe would also be tasty with brandy or amaretto in place of the bourbon.  *~


Spiced Plum Jam

Ingredients:  
-5 c plums, washed, pitted, and rough-chopped
-1 1/3 c sugar
-2 tsp cinnamon
-6 cardomom pods, cracked and placed in a tea strainer or cheese cloth (for easy removal later)
-1 tsp vanilla


Plum (or Peach) Butter
Ingredients:  
-4 lbs plums (or peaches), rough-chopped
-3 c sugar
-2 tsp cinnamon
-zest and juice of 1 lemon
-1 tsp vanilla
-1/2 c crystalized ginger, chopped
-2 tsp bourbon 


 Chocolate Plum Sauce*

Ingredients:
-5 c plums, chopped
-3 c sugar
-1/2 c honey
-1/4 c cocoa powder
-2 tbsp lemon juice
-2 tbsp balsamic vinegar
-1 sprig sage

*We called this a "sauce," as it seemed a little too runny to be called a jam, but you can follow the same instructions as are listed above for jams.  It just won't set up to the jellying stage.  I think I may get more use out of it in sauce form anyway.  It was more amazing than I even imagined.  


I hope you find a few friends and enjoy the can jam experience just as much as eating all that jam!  It's a great way to spend an afternoon.  

Sunday, September 25, 2011

A tale of two figs...

Around this time of year, I have an eye out for a fig source.  I never knew fresh figs until I moved to North Carolina, where figs of all kinds are beginning to be grown profusely.  Growing up, the closest I ever came was a fig newton.  I have a feeling I'm not alone in that.  This year, I found a source for Black Mission Figs when one of my faculty offered to let me pick some off of his trees.  We worked out a deal, a large loaf of fresh-made zucchini bread + a promise of fig jam in the future in exchange for a couple gourmet beers and the motherload of fresh figs waiting to be picked.  Below are the results of that agreement...  two fig preserves recipes, both delicious, one Vanilla-Balsamic Fig Compote, and the other Crystallized Ginger and Champagne Jam.  
Step 1:  The prep...  For both recipes, the first thing I did was wash and quarter my figs, removing an stems still left on them.  I think if I do this again, I will chop them up a little more (maybe in eighths), since my figs were on the large side.  From here on, the tale of to figs will part ways.  
Step 2:  The jams...  Follow the instructions below on how to make each jam.  Note that both require chilling overnight, so this will be a two-day process.  Pick up with Step 3 to see instructions for canning.  

Vanilla-Balsamic Fig Compote

Recipe:
-2.5 lbs of figs, rinsed, stemmed, and chopped
-1.75 lbs of sugar
-juice of 1 lemon
-1 vanilla bean, split (or about 1.5 tsp vanilla extract)
-1/4 c balsamic vinegar
-1/4 tsp (or more) freshly ground black pepper

->  Combine figs, sugar, lemon, and vanilla in a non-reactive bowl (glass or ceramic or non-reactive metal) and refrigerate for at least 6 hours, but overnight is better.  

The next day, pour into a large pot and add the balsamic and pepper.  Bring to a boil and then let simmer for 5-10 minutes until the mixture thickens (see picture below and TIP at the end of this post).  Remove vanilla bean (if used) and proceed to canning instructions in Step 3.  
Crystallized Ginger and Champagne Jam

Recipe:
-5.5 lbs of figs, rinsed, stemmed, and chopped
-2.5 lbs of sugar
-1/2 c minced crystallized ginger
-zest of 2 lemons
-juice of 3 lemons
-1 1/2 c champagne 

->  Put figs into a large pot and add about a 1/2-inch of water.  Simmer figs for about 5 minutes and then give them a quick mash with a potato masher.  Simmer for 20-25 minutes more or until tender and translucent, stirring occasionally.  

Put half of the stewed figs through a food mill or into your food processor until smooth.  

Mix both stewed figs and processed figs with sugar, ginger (see pictured below), lemon juice, and lemon zest in a non-reactive bowl.  Store covered in the fridge for at least 6 hours, but preferably overnight.  

The next day, pour refrigerated mixture into a large pan and add champagne.  Bring to a boil and simmer for about 40 minutes or until thickened (see TIP at the end of this post), stirring frequently and reducing the heat if needed to prevent the mixture from sticking.  Once thickened, proceed to canning instructions in Step 3.  
Step 3:  The canning...

->  At this point you are ready to can your jam(s)!  Pour the hot mixture into sterilized jars, leaving about a 1/4 inch of head space (as pictured below).  
Canning Note:  In order to sterilize your jars, you can wash them in HOT soapy water, put them in a boiling water bath, or pull them straight out of a hot, freshly run dishwasher.  For jams like this, I prefer 1/2-pint or even the smaller 4-oz jars, but pint jars will work too.  Anything bigger than that will mean having to use a whole lotta jam at once when it comes time to open it!  

Once the jars are filled, wipe any residue from the rim of the jars to ensure a good seal.  Put on prepared disks (soaked in boiling water) and screw on sterilized rings.  

Next, you can either put them in a boiling hot water bath for 10-12 minutes or using a pressure cooker at around 7 lbs pressure for 10 minutes.  See my awesome family heirloom pressure cooker below.  It's been canning for decades in my grandma's kitchen, but it came to live with me when she updated to a newer model.  

If using a pressure cooker, allow pressure to come down naturally.  Remove jars.  Allow to cool and then check for a good seal by making sure each lid is concave against the jar (not convex) and does not push down at all when you press it.  
~*TIP:  To test if your jams are "thickened," you can use the freezer test.  Keep a few metal teaspoons in the freezer.  When it comes time to test for thickness, pull one out, put a bit of jam on it, stick it back in the freezer for about 3 minutes, and pull it out.  Push the jam with your finger to see if it wrinkles and/or hold the spoon perpendicular to the floor and see if it runs off or drips slowly.  If your jam wrinkles and/or drips slowly, it's thickened.  If not, keep cooking it for a few more minutes and then try again.  However, how thick you want it may vary.  Sometimes I like mine a little runny with big chunks (more like compote than jam).  *~  

*If you have any concerns about whether you are canning correctly, please see USDA Guidelines here.  

Thursday, May 26, 2011

Yes, Kohlrabi Can!

With fewer kohlrabi plants this year, I had the time to make better use of every part of the plant, including the leaves and their (sometimes rather tough) stems that often overwhelmed me last year.  I would generally just chop them up and add them to whatever I was making with kohlrabi that day, but all too often many of them still ended up in the compost heap.  The recipe below makes use of the stems by pickling them similar to how one might pickle asparagus.  Therefore you could use the same process to pickle asparagus or any number of other things.  The process is somewhat labor intensive since I peeled each stem to remove the woody exterior.  These will need to sit in the pantry for a bit longer before I crack open a jar and we really know if it was all worth it.  
Recipe:
-kohlrabi leaf stems, trimmed to jar height and peeled (yes, peeled)
-1/4 c + 1 Tbsp salt
-3 c water
-2 c vinegar (5% acidity)
-2/3 c sugar
-1 tsp mustard seed
-1 tsp peppercorns 
-1/2 tsp chili pepper flakes
-1 slice fresh lemon per jar
-1 clove garlic per jar
-1 bay leaf per jar

->Soak kohlrabi stems in 1/4 cup salt and enough water to cover them.  

Meanwhile, heat water, vinegar, tablespoon of salt, sugar, mustard seed and peppers in medium sauce pot until simmering.  

While that heats, put lemon slice, garlic clove and bay leaf in sterilized jars.  Remove kohlrabi stems from salted water and pack in jars.  

When brine is simmering, pour over kohlrabi stems into each jar, being sure to get some of the pickling spices in each jar.  

At this point, you could either have "refrigerator pickles," by putting the jar in, yes, the refrigerator and eating them within two weeks.  Alternatively, you could can them.  For this, make sure the jars are filled to about 1/4 inch from the top, wipe rim clean with a damp rag, and seal with lids and bands.  Process in a hot water bath for 10-15 minutes.  Once cooled to room temperature, be sure lids have sealed by pressing them in the center.  They should not press down or "pop."  Store them in a cool, dark place.  I would give them a couple of weeks before you pop one open to try them out!  
~*TIP:  I also followed the S&P recipe for pickled kohlrabi leaves from last year, but processed them the same as above.  They will be in the pantry ready to use for stuffed "grape" leaves all year long!*~  

Monday, November 15, 2010

Pear Butter with Orange and Vanilla

Like its more well-known apple alternative, this pear butter has an almost creamy texture, smooth and spicy.  This version is flavored with orange and vanilla, but there are many different spins you could put on the same basic recipe.  Try this version or try changing up the flavoring with cardamom or fennel.  Regardless, it will be delicious on a warm buttermilk biscuit this winter.  
Recipe:
-4 lbs pears, cored and cut in chunks
-2 c sugar
-juice and grated zest of one orange
-1 tsp vanilla or 1 vanilla bean
-1/4 tsp nutmeg

->  Put pears in a large pot with about one inch of water in the bottom.  Cook until pears are soft then put through a sieve or a food mill.  

Return to pot.  Add sugar, orange zest and juice, vanilla (or vanilla bean), and nutmeg.  Simmer over medium heat until thickened, stirring frequently.  Remove vanilla bean if using.  

Spoon into sterilized jars.  Remove air bubbles and seal with lids and rings.  Process in a hot water bath for 10 minutes.  
*~TIP:  For printable labels, check out this website or make your own and then print them on sticky labels.  *~

Sunday, November 14, 2010

Pear-Lime Jam with Ginger

This fresh and spicy pear jam will be something to use on more than just toast this winter.  This is a really simple recipe without any special ingredients.  The pears and sugar will thicken enough on their own without the need for any added pectin, making the whole process a lot more simple and less technical.  Try out the recipe below and either can it to use it all winter long or store it in the fridge to use within a couple of weeks.  I'll also be giving away jars for the holidays!  
Recipe:
-5 1/2 c pears, cored and chopped finely
-2 c sugar
-1-inch piece of fresh ginger root, grated
-juice and zest of 3 limes.  

->  Combine all ingredients in a large pot and simmer until thickened.  (It's that easy).  

If canning, pour into sterilized jars, seal with lids and process in a hot water bath.  
*~TIP:  To see if your jellies and jams are thickened enough, there are all kinds of tests you can perform.  I usually just put a little dab on a plate, and stick it in the fridge for a minute.  If it's the consistency I want after it's cooled, then I'm ready to stop cooking and start canning.  *~

Friday, November 12, 2010

Pears Mulled in Red Wine

For another twist on pears canned in plain sugar syrup, try mulling your pears in red wine with sugar and mulling spices.  Similar to the vodka pears, these pears and their syrup have all kinds of uses for this winter.  Serve them on their own as you would poached pears.  Add to a winter fruit compote, serve over ice cream, make a delicious holiday drink out of them and/or their syrup, or float them in your favorite holiday punch.  
Recipe:
-pears, peeled, cored, and quartered
-mulling spices (cinnamon sticks, whole cloves, allspice berries)
-1 bottle red wine
-1/2 c sugar

->  Pack pears into sterilized jars with mulling spices (one cinnamon stick, and 3-4 cloves and/or allspice berries).

Heat wine and sugar over medium heat in a medium saucepan until sugar is dissolved and wine is almost at boiling point.

Pour over pears packed in sterilized jars, leaving 1/2 inch of head space.  Remove any air bubbles, place lids on , and screw on screw bands.  Process in a pressure cooker for 10 minutes at 6 lbs of pressure.
~*TIP:  Don't use a wine to can with that you wouldn't drink on its own.  If you don't like the flavor before you sweeten and spice it, chances are you won't like it after either.  *~

Thursday, November 11, 2010

Herbed Vanilla Vodka Pears

This recipe puts a new intoxicating spin on plain pears canned in a sugar syrup.  Pears are packed in jars with either fresh basil or lemon balm from the garden.  Then, the traditional light sugar syrup is combined with vanilla flavored vodka before pouring over the pears.  The inclusion of fresh herbs will hopefully add an interesting flavor twist while providing a burst of summer flavor this winter.  When it's time to crack open a jar of these pears, the pears will be delicious in a winter fruit compote, over ice cream, or perhaps at the bottom of a pear upside-down cake.  The syrup could be used in cocktails, reduced to drizzle over that same ice cream or as a glaze to be soaked up by that pear upside-down cake.  Nothing goes to waste here.  


Recipe:
- Pears, peeled, cored, and quartered
-Fresh herbs such as lemon balm and basil
-1/2 Sugar
-1 c Vanilla vodka

->  Pack pear quarters and herbs into sterilized jars.  

In a medium saucepan, combine sugar with 4 cups of water  for a very light syrup (add more sugar if desired).  Heat over medium heat until sugar is dissolved.  Remove from heat and add vodka.  

Pour over pears in sterilized jars, leaving 1/2 inch of head space.  Remove any air bubbles.  Attach lids and screw bands to jars.  Process in a pressure cooker for 10 minutes at 6 lbs of pressure.  
~*TIP:  Tap jars on the counter and use a butter knife to release visible air bubbles in the jars before sealing.  *~

Wednesday, November 10, 2010

Pears in Light Syrup

This is a simple and classic canning recipe and method for canning lots of pears quickly and easily for use later all through the winter.  The taste of pears canned in a simple syrup may bring back memories from childhood fruit cups, but they provide a useful basic backdrop for the addition of many new and different flavor combinations that will carry you into adulthood.  Today's post will cover the basic recipe and method, but posts later this week will provide a couple of adult twists on a childhood treat.  
Recipe:
-Pears, peeled, cored, and quartered
-Sugar

How much sugar to water (in cups)?
Just Water, No Sugar
Very Light Syrup = 1:7 sugar to water ratio
Light Syrup = 1:3 sugar to water ratio 
Medium Syrup = 1:2 sugar to water ratio
Heavy Syrup = out of control.

->  Pack pear slices into sterilized jars.  

Heat water and sugar in a medium saucepan over medium heat until sugar is dissolved and liquid is almost to boiling point. 

Pour over pears in sterilized jars. leaving 1/2 inch of head space.  Remove any air bubbles and seal with lids and screw bands.  Process in a pressure cooker for 10 minutes at 6 lbs of pressure.  

*~TIP:  One way to sterilize canning jars that beats boiling them all on the stove top is to use your dishwasher.  Load only canning jars into your dishwasher.  Run your dishwasher's normal cycle.  Use immediately when the cycle completes.  Your dishwasher will reach a temperature hot enough to sterilize your jars.  *~

Sunday, November 7, 2010

Spiced Pear Sauce

For the spiced pear sauce, I used the same basic recipe, and then spiced it in two different ways.  The first is a more traditional cinnamon pear sauce, and the second is a spicy ginger pear sauce.  Both are about the consistency of a slightly chunky applesauce but with a unique pear flavor and texture.  Make and eat right away or can for later.  
Recipe:
-about 3 lbs of pears
-about 1/2 c honey
-about 1 Tbsp cinnamon and/or about 2 inches fresh ginger, peeled and minced

->  Wash pears thoroughly.  Trim away blemishes, but leave the skin on for more color and flavor in this recipe.  No need to peel if you don't have to.  Core and cut into large chunks.  

Drain from soaking water (seek TIP below), and add to a large pot with about one inch of water to keep the pears from scorching.  Bring to a boil and let simmer until tender, stirring occasionally.  Put pears through a food mill (you could use a food processor if you don't have a food mill, but i prefer the texture the food mill gives the final product).  

Put the milled pear sauce back into the pot (or into two separate pots if making two differently-spiced sauces).  Add honey to taste, about 1/2 c.  Add cinnamon to one batch and ginger to the other.  Heat sauce(s) just up to the boiling point.  

Ladle into sterilized jars, leaving about 1/2 inch of head space.  Remove any air bubbles.  Fasten with lids and rings, and process in a boiling water bath.  
~*TIP:  For any of the pear recipes to come, keeping the pears  in salted water while they await the cooking pot will keep them from oxidizing and turning brown.  *~

Saturday, November 6, 2010

Week of Pears!

My friend Genna and I picked all of these pears (see below) from an old pear tree behind a farmhouse where her boyfriend lives.  So many pears!  
We spent an entire Sunday peeling, slicing, and canning pears in all different forms (see below).  
For the next week, I'll be posting all of the recipes that came out of this abundance of pears...

Wednesday, May 12, 2010

Stuffed "Grape" Leaves

Don't let 'em fool you...  These may look like stuffed grape leaves, but they are made with the pickled kohlrabi leaves from the last post.  If you didn't bother to pickle any kohlrabi leaves, no worries.  You can pick up a jar of grape leaves at the grocery store and make these from some someone else canned.  You just may want to rinse them before you use them because they'll be made with a lot more salt.  They seem like they take a lot of time to make, but it's mostly down time, and they were well worth it!
Recipe:
-1 large onion, chopped finely
-zest of one lemon
-1/2 c pine nuts
-1 c brown rice
-3 c vegetable stock
-2 Tbsp chopped fresh dill (or one Tbsp dried)
-1/4 c chopped parsley
-kohlrabi leaves, pickled a few days before (see last post)
-juice of two lemons

->Saute onion in oil with lemon zest until translucent.  Add pine nuts and rice.  Stir until coated.  Add 2 c vegetable stock 1/2 c at a time, simmer rice until liquid is evaporated each time and rice is almost cooked, but still a little crunchy in the middle (about 20 min).  Take off the heat and add dill and parsley.  Mix.
Unroll kohlrabi leaf and lay it out flat.  Put about 2 Tbsp of rice filling at the stem end of the leaf.  Then you will want to roll the filling up in the leaf like a burrito.  Fold the bottom of the leaf over the rice, then fold in the sides of the leaf.  Roll the rice mixture all the way up in the leaf.  Once it is rolled up, squeeze the stuffed leaf gently in your fist to remove any air or extra liquid.
Put the stuffed kohlrabi leaves in a wide deep skillet, seam-side down.  Pour the remaining broth, lemon juice and a heave drizzle of olive oil over them.  The liquid should be about halfway up the sides of the grape leaves.  If it isn't, add water or broth until it is.  Simmer with the lid on for about 30 minutes.  Remove from liquid.  Serve at room temperature or chilled on a bed of lettuce and garnish with olives (if for guests), or eat them straight out of the pan (if for you).

~*TIP: Put a heavy plate (or two) over the stuffed grape leaves while cooking them in the pan to hold them in place so that they don't unroll while simmering.*~

Pickled Kohlrabi Leaves

With my most recent kohlrabi harvest, because the actual kohlrabi stem did not really swell like it should on most of my plants, I am left with an abundance of kohlrabi greens to use.  I've put them to almost every use I can think of, but still I wondered, is there any way I could preserve these to use later?  Freeze them?  Can them?  Canning greens sounds gross, right?  But then I wondered if there would be a way to pickle kohlrabi leaves in the same way grape leaves are pickled.  Here is my attempt.  You could of course use this recipe on actual grape leaves or other sturdy greens.
Recipe:
-Kohlrabi greens, rinsed (at least 10 intact leaves bigger than your hand)
-2 tsp kosher salt
-1 c lemon juice
-1 quart water

->To prepare the kohlrabi leaves, cut stems off of leaves flush with leaf.  Trim thicker parts of stems off of back of leaves.  Blanch leaves by plunging them into boiling water until bright green then take out and stack flat.
Combine salt, water, and lemon juice and bring to a boil.
While waiting for liquid to boil, roll leaves up so that they will fit inside of a quart jar.  I rolled mine individually so that they would fill the entire jar, but if you had a lot of leaves, you could roll them in groups of three.  I find it works best to roll them like a burrito, fold in the sides of the leaf, and then roll them up.
Situate rolled leaves in a quart jar.  Pour hot liquid over the leaves, and put the lid and ring on the jar.  This would be the time to process the jar of kohlrabi leaves if you want to can them long term.  However, I planned to use them this week, so I just let the jar cool and then put it in the refrigerator.

~*TIP: See next post for how to use these to make home-made stuffed grape leaves, one of my favorites.*~