Saturday, August 18, 2012

Scavenging in the Great North

Derek and I just returned from a week in the great north, i.e. a cabin my family has on the Ottawa River in Canada.  I have been going there just about every year for my whole life, and Derek has joined for the last two years now.  The weather was a bit gray all week, but it was a welcome respite from the Carolina heat we're used to...  
This week gave me a chance for some genuine wilderness foraging rather than the urban foraging that has now become my custom.  Since I was a little girl, I remember picking teaberry leaves and berries and chewing on their wintergreen flavor.  There are also often wild blueberries, red raspberries, and blackberries.  This year, the blueberry crop was nil due to lack of rain in the area...  but I was able to get a pretty good crop of blackberries.   
 I gathered as many blackberries and teaberry flowers, berries, and young leaves as a could.  These delights were then frozen to come home with me for a future as who knows what?  Minty berry jam?  Black Teaberry Syrup?  It could be anything, but it will make an appearance on S&P soon enough.  I also picked up a few pine cones along the way for some Christmas decorations this winter.
Finally, our food production up there was not just limited to gathering, we also did a bit of fishing and have a few nice bass filets, including the ones from this fella right here.  
Keep an eye out for how we use all of our great delights from the great north in the next few weeks!  

Sunday, August 12, 2012

Velvety Gazpacho

Continuing with my chilled soup kick lately, I am sharing a really great version of an old classic...  a Gazpacho that is tangy and spicy, yet refreshing and velvety on the tongue.  The key to the wonderfully creamy texture is not to be too shy with the olive oil here...  The emulsion of pureed veggies with olive oil gives you a filling, creamy, cool soup that you won't get if you skimp!
Ingredients:
-tomatoes (mix and match whatever you have...  I used about 2 pints of various cherry tomato varieties)
-1 medium cucumber, chunked
-1/2 a small onion, chunked
-1 clove garlic, smashed
-1 small red bell pepper, chunked
-1 bunch basil, torn or roughly chopped
-juice of 1 lemon
-1 tbsp vinegar (white wine or apple cider)
-1-3 tsp Sriracha or preferred hot sauce (depending on how spicy you like it)
-1 tsp cumin
-1-2 splashes Worcestershire (optional)
-salt to taste
-olive oil (about 1/4-1/3 cup)

->  Put all ingredients except salt and oil in food processor or blender and blend until relatively smooth (there will be a slightly pulpy texture, but it should be completely uniform with no chunks).  At this point, with processor running, drizzle in olive oil slowly until soup reaches a creamy consistency.  Season with salt to taste.

~*TIP:  If there is any bitterness to the soup, you can add about a teaspoon of honey to the mix.  It will cut the bitterness without making the soup sweet.  *~

Wednesday, August 8, 2012

Chilled Tomato Soup

Today, the tomato is on the edge between the fruit and vegetable camps...  This time coming down just barely on the vegetable side.  This recipe only takes a few minutes to throw together, but it is creamy, refreshing, and delicious.  When it's finished, drink it straight-up like a smoothie, serve just a shooter of it as an amuse-bouche, or eat a whole bowl for a soup course.
Ingredients:
-2 medium to large tomatoes, cut in chunks
-1 c plain yogurt
-juice 1/2 a lemon
-salt

->Put all ingredients in a food processor or blender and blend until smooth.  Chill.
That's it!

~*TIP:  Switch up the flavor by throwing in a different mix of herbs each time or switching up limes for lemons...  try fresh basil, mint, tarragon, chives, or cilantro.  *~  

Sunday, August 5, 2012

Biodegradable Seed-Starting Pots out of TP Rolls

After seeing a few pictures of this online, I decided to try it myself.  I usually use the traditional plastic cell-packs in a seed-starting greenhouse (see here on seed starting).  However, I am always looking for ways to get away from using plastic as much as possible in all aspects of my life, including gardening.  Also, it's always my goal to have as few inputs as possible into our gardening efforts, closing the loop as much as is feasible.  One way I might be able to close that loop a little more is through using our empty toilet paper rolls as seed-starting pods instead of ever investing in plastic cell packs again...  and the best part is, they're biodegradable!  I can just plant the whole pot, and let them break down in the soil.  See tutorial below on how to make your own.  

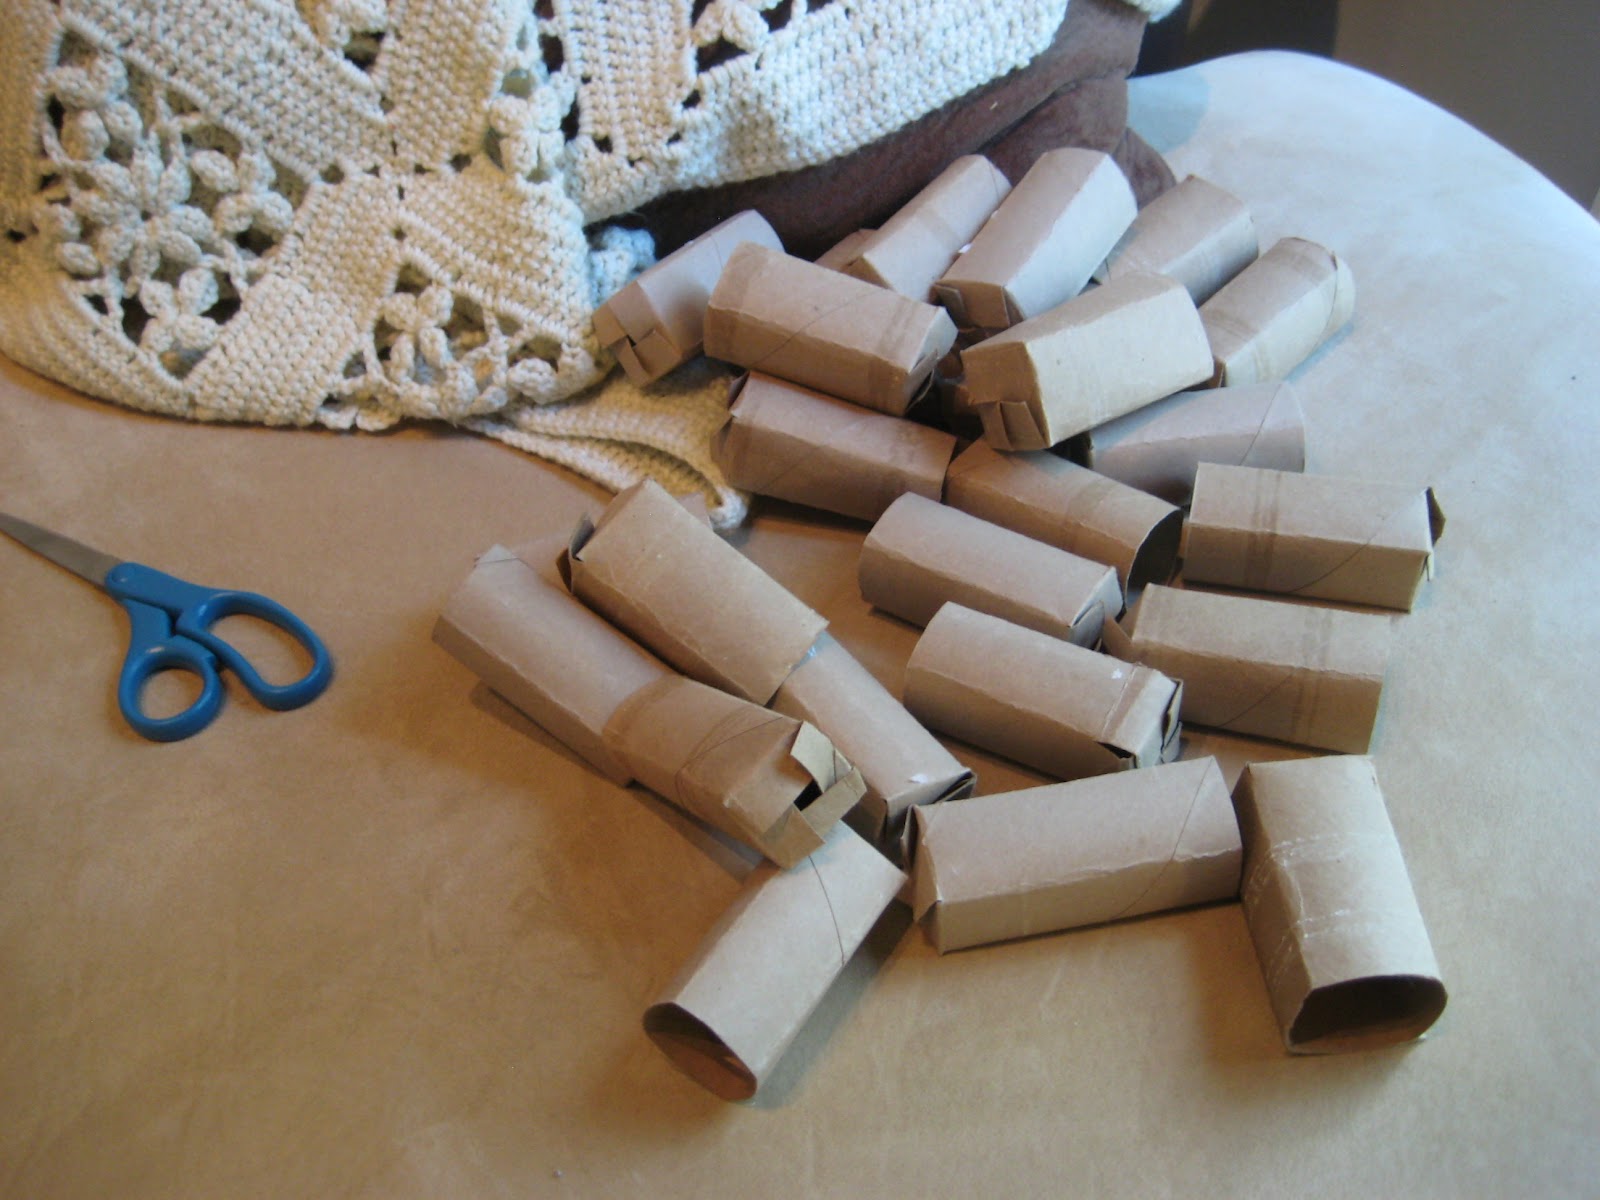
Start with a clean, empty TP roll.
From here, shmush the roll down to fold it in half so that it has creases running down the sides.  The unfold and shmush it down so that the existing creases meet in the middle.  When your done, it should have taken on a square shape like the picture below.  
If you want more defined folds and to save your hands a little effort, you can also use a ruler on a hard surface to give the roll a hard crease.  
 Now, you want to cut up the creases on the bottom of the roll just enough to make flaps that reach halfway across the opening of the roll.  All rolls are a slightly different size, so I am not bothering to give an exact measurement.  For example, the fluffy stuff Derek had here originally had much wider rolls than the Seventh-Generation I replaced it with...  kudos to Seventh Generation for giving us less empty space.  

Fold the flaps so that they are creased across right where the slits end (like pictures below).  
Finally, fold the flaps as you would if you were trying to close a cardboard box by interlocking the flaps, as pictured below.  
 You can make a whole bunch in just a short time!
 
And they'll stand up to fit in your seed-starting trays right along with those old cell packs...  And then when your plants are ready to go outside, you can bury the whole things in the ground, and it will break down on its own.  
~*NOTE:  I have not yet planted these, so I'll let you know what the positives/drawbacks are once I know.  However, similar to peat pellets, I would recommend that you be sure to bury the lip of the roll completely under the soil line, or else it could act as a wick, drying out the roll-pot, and thus, your plants.  *~

Wednesday, August 1, 2012

Watermelon-Tomato Sorbet with Basil

Ahhh...  to answer the age-old question of whether the tomato lies in the camp with the fruit or the vegetable...  This week, chalk one up to the fruit side, because these tomatoes are the star of the dessert course.  With watermelon-tomato salads becoming very popular these days in the South, I was inspired to try a sweet, melty version of this in the form of a watermelon-tomato sorbet.  I was further enabled by a recent thrift store find of a soft-server ice cream maker for $4.99!!!  But don't worry.  You don't need an ice cream maker to make this recipe (see NOTE below).
Ingredients:
-2 medium to large tomatoes (I used tangerine tomatoes), cut in chunks
-1/2 a small watermelon, cut in chunks
-1 c sugar
-1 c water
-1 large bunch basil, minced
-juice of 2 limes

->Heat the sugar and water over medium heat in a small sauce pan until sugar is fully dissolved. 

Meanwhile, run tomatoes and melon through a food mill in order to get the pulp and juice but leave behind the skins and seeds.  If you don't have a food mill, you could use a food processor, just be sure to remove any large seeds of the watermelon and/or tough stem areas of the tomato.  

When sugar is fully dissolved in the water, remove from heat and add basil to steep.  After steeping for 5 minutes, add mixture to tomato-watermelon mixture and then add lime juice.

At this point, you should chill the mixture in the freezer until ice just starts to form around the edges (or around 8 degrees Celsius).  Then, if you have an ice cream maker, pour it in and follow the manufacturer's instructions.  

Serve by scooping some with an ice cream scoop, perhaps into martini glasses?  Garnish with a fresh sprig of basil.

~*TIP:  If you do not have an ice cream maker, pour the mixture into a shallow pan and place in the freezer.  Whisk the mixture every 30 minutes or so to break up the ice crystals until it is too thick to whisk, then allow to freeze.  Scoop once frozen mostly solid but still soft enough to easily scoop.  *~

Sunday, July 29, 2012

Summer Garden Tour

This year's summer garden went in a little late because of the transition to the new locale, but it is now in and thriving!  Cherry tomatoes, okra, and cucumbers are just starting to put out...  But melons, peppers, eggplant, sweet potatoes, corn, beans, pumpkins, and other tomatoes are still to come!  Check it out in the slideshow below.  I'll be sharing more details on how each one went in and how it's doing as the season progresses.

Friday, July 27, 2012

Back.

Shoots and Platters has been on a long-term hiatus for the past 8 months or so...  but, we are back!  And now at a new location...  Thank you all for sticking with us.  Derek and Amanda will be cooking up dishes from the veggies in their backyard garden from now on.  Amanda's curbside garden has been passed down into good hands and continues to produce good food from curb to table, but no longer by Amanda.

We are excited to share our gardening and cooking adventures with you from our new locale!

Amanda and Derek